Gravity Forms
This document will explain how to enable Gravity Forms with the Next.js WordPress Starter.
Prerequisites
You will need to have the following WordPress plugins installed:
These plugins should have been installed when you ran
composer installduring the initial Backend Setup.
Backend Setup
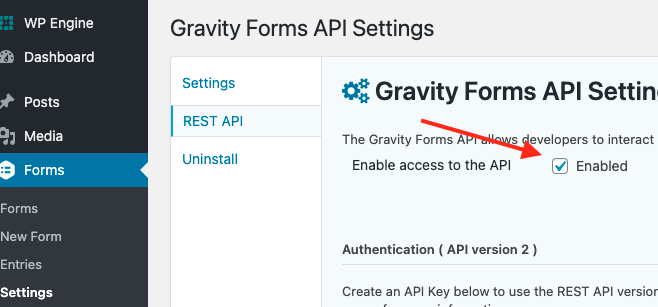
Enable the Gravity Forms REST API
The Gravity Forms REST API must be enabled separately from the WordPress REST API.
- Under "Forms", click "Settings".
- Click "REST API", then click the "Enable" checkbox
Turn off error displays
The Gravity Forms plugin will throw PHP warnings under many valid circumstances. These errors do not affect the actual submission of the form, but they will cause errors in the Javascript frontend.
- Turn off error displays in
php.ini. If you are using Local, this can be found inconf/php/php.ini.hbsin the site folder. Check lines 16-24 for these settings. - Turn off
WP_DEBUGif it is enabled. This is in yourwp-config.phpfile.
If you get an error involving Access-Control-Allow-Origin or "The string did not match the expected pattern", then this is likely the culprit.
Ensure WordPress is accessible from the internet
The Gravity Forms submission process requires the Javascript frontend to be able to access the WordPress API directly. It will not work if WordPress is behind a firewall or otherwise restricted in access.
Frontend Setup
Using Gravity Forms
To display a Gravity Form, simply use the Gravity Form block in the WordPress block editor. The Next.js starter will pull the information from GraphQL and render the form.
The Gravity Form block component is a simple wrapper around the GravityForm component found in components/molecules/GravityForm. Both are designed to work with information from GraphQL.
The GravityForm component itself uses the Form component from components/molecules/form which uses the Formik library. The individual fields are rendered from components in the Fields folder with the components being chosen in the Fields component itself.
If a field does not have a corresponding component, a message will be displayed on the frontend. Create a new component and add it to the Fields component.
Submitting a Gravity Form entry
The process required to successfully submit a Gravity Form is a little complicated due to the potential presence of a file upload field. The process works as follows:
- User submits the form which triggers the
onSubmithandler inGravityForm. - The component first fetches the Next.js endpoint at
/api/wp/getWPUrlin order to get the URL of the original WordPress instance. - The component translates the Formik output into a FormData object.
- The form is submitted as a
multipart/form-datarequest to the Gravity Forms API. - If there is an error, it is shown to the user using the
formFeedbackstate variable. - If the form was submitted successfully, the success message from Gravity Forms is shown. This can include rich HTML.
Ideally, this should just work. Check the Backend Setup section first if issues arise.